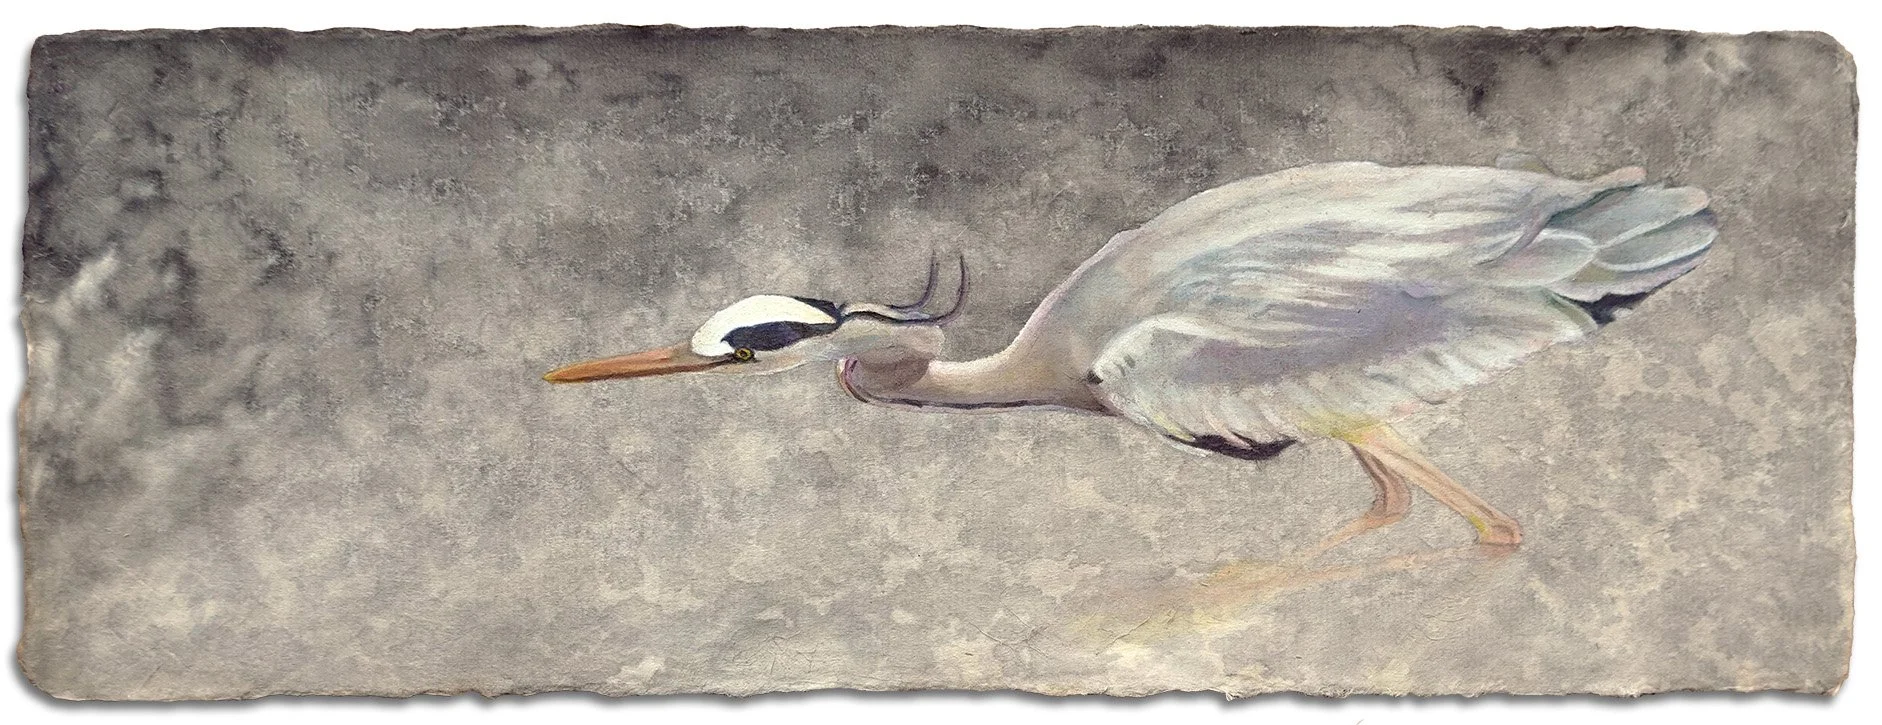
New Artwork

New Artwork: Woven Thresholds

I’ve been painting red flowers lately, and I intentionally chose to continue that trend since I was building around a component I planned to use from the start: a jacquard folk pattern trim I picked up at Karnaluks OÜ in Tallinn. Once I saw a stand of vivid tulips, the rest of the composition came together..

The process differed from Between Worlds. Here, I painted the floater panel and tulips first, then laid down plastic and painted the lace pattern on top of it. After removing both those layers, I worked through a wide range of compositional options before settling on this angled, mirrored lace overlay. From there I secured the lace, added the trim, then cleaned up and secured the back. This was the second piece I started, but the third to finish! The delay was due to the sequential steps I needed to complete, each of which involved drying/curing periods.

Iconographically, tulips function as shields, threshold filters, and barriers across multiple traditions, a symbolism rooted in their nyctinasty: they close their petals tightly at night or on cloudy days, sealing their core away from cold, damp, and nocturnal threats. That self-protective habit is part of why tulips are believed to draw in positive energy while keeping poverty, bad luck, and hostility from crossing into the home, and why they carry associations of safety within oppressive environments. The lace adds a further veil over the tulips, while the mirrored, overlapping composition contributes a sense of movement and dissonance.

The outer border carries its own layer of meaning: it is a traditional Baltic woven band steeped in regional folklore and protective symbolism. Its color scheme has historically represented life, fire, and an active shield against negative energy. The pattern combines two ancient Baltic symbols: the Cross of Māra, tied to the Latvian goddess of earth and home and read as a sign of grounding and stability, and the hourglass motif, which represents the rhythm of time and the meeting point of the spiritual and physical worlds.

This is Woven Thresholds, acrylic, lace, and jacquard trim on wooden floater panel, 14x11x.5”, 2026.

Shelby Prindaville’s mixed media lace painting of tulips on a floater panel with Baltic jacquard trim.

New Artwork: Sower's Shadow

Wool is ubiquitous here in the Nordic-Baltic region, appearing in many forms: knitted, crocheted, and felted into clothing, mittens, and gloves; accessories like hats, necklaces, and pins; and home goods like placemats, blankets, and children's stuffed animals.

When I came across a felt letter board at a vintage shop in Pärnu, it spoke to me as a viable substrate. I wanted to incorporate wool in some way into my Estonian body of work given its regional importance, and I also liked the idea of converting a familiar mechanism for rigid text-based communication into artwork that through removal of its frame, rotation, and incorporation of organic form brings new associations.

This second finished mixed media painting depicts a rook (Corvus frugilegus). A member of the corvid family (which also includes crows, ravens, and jackdaws), rooks forage on arable land and nest close to farms and villages.

This is Sower’s Shadow, acrylic, molding paste, and matte medium on felt letter board, 11x14.9x.4”, 2026.

Shelby Prindaville's painting of a rook on a felt letter board.

New Artwork: Between Worlds

My first finished mixed media painting in Estonia depicts a white stork (Ciconia ciconia).

The substrate is antique lace over wood panel. My process involved attaching the lace to the panel, painting the portrait, removing the lace and altering the coloration of the wood panel surface, and then meticulously re-registering and attaching the lace back on top and sealing it down.

These birds are embedded in Estonian rural life: they're associated with summer farms and considered good luck omens. Storks are also important in folklore, as they accompany souls to the underworld and bring newborns into the world as a part of a cycle of death and rebirth in Finno-Ugric mythology.

This is Between Worlds, acrylic and antique lace on wood panel, 14x14x1.5”, 2026.

Shelby Prindaville's mixed media lace painting of a white stork.

New Artwork: Remnant and Relic

Here’s my two-piece entry into the Got Ya Covered invitational group competition! I began by sifting through some vinyl records the Morningside music department was willing to let me use, and I settled on The Pride of America: The Golden Age of the American March. This selection in combination with my route forward has environmental and political resonance.

A straightforward painted image on the record ultimately felt too detached from my practice, which focuses on ecology and materiality. I found myself more interested in the record as a petroleum-based artifact of human industry and consumption, and decided to pursue natural degradation and corrosion as my artistic approach.

Below are the the finished pieces!

Remnant, mixed media including layered stains on deteriorated album jacket, 12.5x12.5”, 2026.

Relic, mixed media including patination and surface accretion on vinyl record, 12.1x12.1x.2”, 2026.

More Raku Saggar "Faux Pit Fire" Attempts

You may recall I previously experimented with using raku aluminum foil saggars to approximate pit firing. That first time, I just tried it on one piece of burnished pottery; I liked the results!

At this recent workshop, I did two more. I also added some combustibles I hadn’t yet tried: Miracle Gro fertilizer crystals and Zep Root Kill crystals (copper sulfate pentahydrate). If I were doing actual, controlled experiments, I would test one variable at a time and then combinations of two at a time, three, and so forth. However, I have to pay firing fees for each piece of pottery I take to these workshops, so instead I’m being pretty liberal with my variables.

I strategically placed root kill crystals, Miracle Gro, coffee grounds, banana peel, copper mesh, copper wire, and steel wool in and around the bowl below. This time, I tacked the crystals and powder to the foil and the bowl with hairspray, so it could stay in contact with the interior and exterior sides instead of just falling to the bottom. I wrapped that all fairly tightly with a layer of aluminum foil. Then I poured some salt on and added another two layers of aluminum foil, hoping to get some cool fuming reactions.

I waited to see how the bowl turned out before committing to doing another with this same finishing technique. I admit that I was hoping the new crystals I added would have contributed a wider range of colors, but I nevertheless liked the result.

However, I wanted even more finer carbon marks on my second piece (a plate), so I used the same ingredients and added a small sprinkling of sugar as well. I again put some salt between the first and second layer of aluminum, and it didn’t seem like it required a third foil layer for coverage (it was easier to wrap the flatter form) so it got fired with just two.

I adore this plate - it’s either tied for my favorite piece from this firing or might take first place.

New Raku Copper Glaze Pottery

Since I focused on hump mold pottery for this workshop, I was able to bring a number of pieces with surface texture. In my opinion, I thought copper glazes would be the best choice for those textures! On all of these pieces, I only glazed the top or interior, and left the outside and rim unglazed to carbon trap smoke and become a matte dark gray. I did some planning and sketches ahead of time, and decided I preferred that contrast more than doing a copper glaze exterior as well

I used a variety of glazes both in combination and individually on a couple pieces. They included Tutti Frutti, Blue Copper Flash, Blue Silver Luster, Golden Rainbow, Peacock, Lithium Carbonate and Midnight Luster.

Here is a textured plate with Tutti Frutti on the outer rim and Blue Copper Flash on the inside.

Next is a similar plate, glazed entirely with Golden Rainbow.

This plate was more experimental - I left some geometric shapes that aligned with the texture I imprinted unglazed, so they joined the base and rim in becoming matte dark gray. Then I glazed aligning with the texture again in three segments: Golden Rainbow, Blue Silver Luster, and Midnight Luster.

This is a small, curved dish. I no longer recall what I did with the glazing on this one, but I’m pretty sure it was a mix!

This bowl is the other piece tied for my favorite from this workshop! It has light texture and was glazed on the interior toward the rim with Tutti Frutti and toward the bottom with Blue Copper Flash.

I never know how lithium carbonate will come out - sometimes it’s gorgeous, sometimes it’s meh, and often I over-apply it and undesirable results like blistering occur. I decided to try it on this bowl, and I’m happy that this time I didn’t over apply. I was hoping for one of the radiant, glossy finishes it can do, but it chose a more satin, sedate finish. I still like it!

I refired this large dish after putting a bit more glaze on, as the way the glaze appeared on the first firing was to my mind not pleasing (though others said they really liked it). Though refiring stresses a piece and can cause it to crack or lead to even worse glaze results, in this case it came out whole and I much prefer it in its second evolution!

Clear and White Crackle Raku Ceramics - Stripe Edition

I decided to try clear crackle atop the wavy Mason-stain striped bowl you can see on the shelf in the second photo in this post. Unfortunately (at least to my mind), the very light pink and lavender stripes went almost completely fugitive in the heat; the orange fared much better, but it means the overall result is not what I had intended!

I still think it’s interesting, though:

I also applied white crackle in an asymmetrical split to this plate, choosing to leave a stripe unglazed so it would carbon trap the smoke in the reduction enviroment:

Mason Stain Obvara Raku Ceramics - Round 2

I tried out finishing some burnished, Mason stained pottery with the obvara technique in my last workshop, but it turned out the obvara had a difficult time clinging onto the surfaces; I decided to try again with unburnished Mason stained ceramics.

I decided to do three bowls stained a very light pink, a stronger orange pastel, and a stronger lavender pastel. I think the results of those stains were extremely subtle. This was in part because the lavender pigmentation went partially fugitive, the orange is perhaps too akin in hue, and the pink was already barely there and also went fugitive. It’s also because I allowed them to go into the fermented yeast bath right out of the kiln instead of cooling off for a minute or two, and I’ve found that when the pottery is at its top temperature, the majority of the carbonization is usually quite dark. That obviously covers over any underlying stain, but it provides a fuller value range and in the areas where there is minimal carbonization, it leads to high contrast. They’re beautiful obvara bowls, regardless of whether the Mason stains had much impact!

Here is the very light pink:

Next, the orange (note that the lighter areas are a bit warmer!):

Finally, the lavender; interestingly despite the fugitive nature the one that is perhaps the most visible due to the coolness it contributes:

Mason Stained, Ferric Chloride Saggar Raku Ceramics

Bisqued pottery ready for the workshop!

Here are the Mason stained, ferric chloride dipped, and saggar fired pottery resulting from my fall workshop! I used three different Mason stains: chartreuse, jade green, and dark teal. I mixed the stains with terra sigillata and applied them in a variety of ways (brush, sponge, scraper). I was purposely going for choppier, sectioned out applications of the Mason stain this workshop to compliment the choppy, random ferric chloride saggar markmaking. (I previously experimented with all-over solid dark teal in varying terra sigillata tints.) To the right is an image of all the bisqued pieces for awaiting ferric chloride dipping for this workshop.

After applying the ferric chloride, I did use a combination of sugar, copper mesh, copper wire, and/or Muehlenbeckia axillaris aka Creeping Wire Vine to contribute additional texture/carbonization, and then wrapped the pieces up in aluminum foil.

First, a large bowl:

Next, a squat vase:

This is a taller, medium-sized bowl:

A sideways-opening orb - I think it’s one of those pieces that doesn’t photograph as well, so it’s significantly cooler in person:

Finally, my favorite piece (mostly due to the finish, but I also like the shape). However, it unfortunately blew off an outer side piece of exterior as well as a piece off the bottom in the stressful firing and cooling process. Since it’s raku anyway (meaning it’s not food-safe or watertight even when undamaged), it’s less important when a piece is damaged. Luckily neither of these blown-off spots went all the way through the ceramic body or caused cracks to the body itself, so they’re just cosmetic and the ceramic itself is still sturdy. I decided to try a kintsugi-inspired repair for the side wall, and just put a foam furniture foot in the bottom cavity for added stability.

If you want to see a clearer detail shot on the kintsugi-inspired repair, here you go! I used a combination of super glue, gold mica powder, a little spackle, and quinacridone / nickel azo gold paint to achieve this repair. I initially had planned on just using super glue and gold powder, but the gold wasn’t showing up as much as I wanted and there was still a bit of unevenness to the edge so I added the spackle and paint to smooth it out and deepen the color.

Again, since the blown-out section was shallow enough, it did not require repair on the interior side.

As you may know, real kintsugi is a much more laborious, toxic process (I did one of the steps in a workshop in Japan in 2024) that when done correctly ensures food-safe results to originally food-safe ware; to my mind it is overkill for non-food-safe rakuware.

Mason Stained, Burnished Obvara Raku Pottery

At this most recent raku workshop I attended in late October 2025, I experimented with Mason stains in several ways. For the obvara, I did two burnished pieces with very light mason stains. I think it mostly worked well, but the obvara carbonization had a somewhat difficult time really gripping onto the surface, so I think next time I might not burnish and see how that goes.

Here is the first ceramic piece, a burnished oval bowl I did a large polka dot pastel pattern on with small amounts of teal and chartreuse Mason stains mixed into terra sigillata:

Here is the second, a burnished round bowl with a small amount of teal Mason stain mixed into terra sigillata:

Japanese Site-Specific Pottery!

While I was in Japan this summer, I visited a number of important ceramic-production locations (Shigaraki, Imari, Arita, and Karatsu). I’d wanted to make ceramics during my first Arts Itoya residency, but the firing timings did not align with a one-month stay; for my second I was there for even less time due to my Kyoto solo show so I knew it couldn’t happen.

However, on this second trip I bought a small quantity of Shigaraki clay (Shigaraki is one of the six ancient kilns of Japan) and gathered volcanic ash (with the permission of my tour guide) outside of a shrine on Mount Aso. I brought these materials back with me, and made a couple of pieces!

My hope had been that the Shigaraki clay I purchased had the feldspar inclusions that lead to a sort of blistered, weeping surface; those descriptors don’t sound particularly aesthetically compelling but I really like the unique finish. However this didn’t happen with the clay I bought. It could potentially be due to how I fired it (Cone 6 electric), but from its pre-fired texture, I don’t think it had those inclusions in it to begin with. Though that was a disappointment, I am still happy with the resulting pieces.

I made a medium-sized bowl and a very small bowl, and the images below depict them individually as well as together for a better sense of scale. They are site-specific to Japan and materially meaningful!

Previous Raku Workshop: Faux Pit Firing

I experimented one last time at the April 2025 workshop: I wanted to approximate pit firing, so I put a burnished bowl into an aluminum foil saggar along with a variety of combustibles including dried banana peel, coffee grounds, steel wool, and some metal salts.

Here is that bowl post-firing:

The metal salts didn’t really do much, but the rest of the colorants did produce a range of neutrals! I really liked this result and plan to do more in this vein in the future.

My Previous Raku Workshop: Mason Stain Saggar Pottery

Before we get to my pieces from the October 2025 workshop, I never finished sharing my April 2025 raku pottery as I segued into Japanese residency posts and then went on from there! When we last left off, I had shared my experiments with Mason stains and crackle glazes.

I also experimented with dark teal Mason stain and ferric chloride saggar-fired pottery!

First, we have an orb marked with copper mesh:

This is a small dish which has some marks from a copper wire on the exterior:

Next, an oblong vase! The black smoky spots are from testing out a bit of copper tape:

Finally, a small bowl, using a strip of copper mesh this time!

Arts Itoya 2025 Residency Artwork 5: Edge of Motion

After I painted After the Rain, I still had one sheet of the Nao Washi paper I had purchased left, and I was still very interested in working with the sumi as well - so I decided to make another in the same vein! This time, the subject is a grey heron (Ardea cinerea) I spotted hunting in a river. I fortunately finished this painting just ahead of when I needed to pack up at the end of the residency!

This is Edge of Motion, sumi and acrylic on washi paper, 5.3 x 15", 2025.

New Challenge-Based Artwork: Construct

Once again interrupting my Japanese posts to remind you that the invitational You Want a Piece of Me? exhibition which I previously posted about here ends on August 17, 2025, so due to the gallery’s open hours you have two more dates left in which to stop by! I’ll get more into that below, but first, let’s do a deep dive into what I did.

This show asked artists to create art using a jigsaw puzzle, or puzzle pieces, as part of the art - and to leave at least some portion of original puzzle visible. You may recall that last year we did a similar challenge using board games, and here is what I did for that Advance to Gogh show in 2024!

For You Want a Piece of Me?, I needed to recycle puzzles - but I don’t own any, so I stopped by a thrift store and perused their offerings. I ended up buying three puzzles, mostly based on the differing scale of the pieces. I hadn’t decided what to do yet, but I figured owning these puzzles was a good first step. They were, in order of scale: L.O.L.Surprise! Floor Puzzle [large pieces], Milton Bradley lambs puzzle [medium pieces, 1 original piece held in an octopus tentacle], Milton Bradley Big Ben waterfall puzzle [small pieces, 1 original piece held in an octopus tentacle].

I pondered what I wanted to do with them for some time, as I wanted to make something that was still my own but that also satisfied the challenge parameters. I eventually decided I’d make a sort of topography out of the puzzles. This required actually building them, which for the 1000 piece puzzle took far longer than I wanted it to; I ended up building the other two easily but only assembling a few sections of the Milton Bradley Big Ben waterfall puzzle until I had enough connected material to satisfy my needs.

Then I built up a patchwork foundation, purposefully rejecting any edge pieces as I wanted the sculpture to communicate growth potential along its full border. After I glued it together and somewhat leveled its base, I then sculpted an octopus atop it. I formed the octopus out of QCC, clutching a mid-sized puzzle piece in one of its tentacles and a small piece in another. I also added some sand ridges. After curing, I painted the whole sculpture! Here are some progress pictures:

And here’s the finished piece! This is Construct, acrylic, QuickCure Clay, glue, and puzzle pieces, 16x25.67x3.25", 2025.

If you want to see Construct and the other Gallery 103 You Want a Piece of Me? entries in person, you can stop by either tomorrow (Saturday, August 9th) or next Saturday, August 16th between 10am and 1pm. Gallery 103 is located on the ground floor of the Ho-Chunk Centre located at 600 4th St, Sioux City, IA 51101.

Arts Itoya 2025 Residency Artwork 4: After the Rain

In my travels in Japan, I’ve repeatedly come across calligraphy tools, artwork, and even participated in a 5th grade calligraphy lesson last year in Yamanashi City! In art classrooms in the US, the primary liquid ink we use is India ink (sometimes called China ink). Sumi is a bit different; the primary differentiator is that liquid sumi is typically soot bound with a synthetic glue that is not waterproof, so it can be lifted even after it dries. India ink is typically waterproof after drying. Sumi also has a more expressive and variable tone compared to the uniform performance of India ink.

In Japan, there is a type of artwork called sumi-e, which are ink wash paintings. They are often 100% sumi, though some add small accents with red ink and you can find some outliers that expand the color palette just a bit further. By adding acrylic paint, however, I have definitely strayed outside of making a traditional sumi-e. This would be better classified as mixed media, inspired by sumi-e. I painted atop a washi paper I purchased at Nao Washi in Saga.

The subject of this painting is a Japanese native freshwater crab (Geothelphusa dehaani) called sawagani (サワガニ). I have seen these crabs all around Japan, often in and around streams but also venturing further afield in evening rains. I encountered this one on the street while biking home from the studio one night right after the rain had stopped.

This is After the Rain, sumi and acrylic on washi paper, 5.3 x 15", 2025.

Arts Itoya 2025 Residency Artwork 3: Blue Hour (藍影)

Painting tanuki (Nyctereutes viverrinus) unintentionally became a multi-year quest, which lived up to the yokai version’s reputation for illusions and light-hearted trickery.

I decided to paint them on the fan-shaped washi paper which I dyed with indigo (aizome) in my workshop in Tokyo in mid-May. Due to the coloration of the washi and the folkloric aspect of tanuki, I chose to paint them in a limited color palette which isn’t completely monochromatic but which has indigo as the key color.

Tanuki are nocturnal, so the English title Blue Hour felt appropriate as the blue hour is a term for the short period of twilight just before sunrise or just after sunset. The Japanese title is 藍影 (Aikage), which means Indigo Shadows.

This is Blue Hour (藍影), acrylic and traditional indigo dye on fan-shaped washi paper, 7.7x15.75”, 2025.

Arts Itoya 2025 Residency Artwork 2: Even the Shadows Are Fresh

There’s a word in Japanese that doesn’t quite have a satisfying translation to English: 新緑 (shinryoku). It’s the new, lush green of early summer. One of the plants that always captures that feeling for me is the ginkgo tree (Ginkgo biloba). I wanted to capture 新緑 in a painting of ginkgo leaves.

In researching possible titles for this painting, I learned that the ginkgo tree holds particular significance in Japan as one of the “survivor trees” that survived the atomic bombing of Hiroshima. I watched a short documentary on the man who has dedicated himself to caring for these trees and the trees themselves here. I highly recommend watching it; it is a moving story.

I also was inspired by haiku about shinryoku and related concepts like wakaba and midorisasu, like this poem from the poet Teruko from the Rainier Haiku Ginsha: “は一色ならず色重ね (shinryoku wa hitoiro narazu irokasane) / fresh green is not one color but layered hues.”

This is Even the Shadows Are Fresh (新緑), acrylic on round wooden panel, 12x12x.875”, 2025.

As a little bonus, here are a few images I’ve gathered of ginkgo leave motifs around Japan!

Arts Itoya 2025 Residency Artwork 1: Red Spider Lily

I’ve wanted to paint a red spider lily (Lycoris radiata) for some time because of their Asian iconography. In Japanese, this flower is the 彼岸花 (higanbana), and it symbolizes death, farewells, and the afterlife across Asia. It is planted around graveyards due to its toxicity, which discourages animals from disturbing graves. In artwork and storytelling (including anime), higanbana often foreshadows an upcoming fatality. An interesting botanical aside about this plant is that the bulb blooms first; usually only after the flowers die does it send out leaves!

Higanbana blooms between late August through early October, around the autumnal equinox. Due to my teaching schedule, my visits have only been possible in the early summer, so I couldn’t see them bloom in person here in Japan. I also tried and failed to source a bloom in the USA; due to its floriography, florists don’t carry it and if I bought and planted a bulb, it typically takes 4-7 years to flower.

However, a friend and Morningside alumna is relocating soon to Tokyo, and she was visiting Japan last autumn. I asked her if she’d be able to do me the favor of taking a few photos of these flowers and ceding me the copyright. She was willing and accomplished the task, so when I arrived at Takeo-onsen, I began work on this painting right away!

This is Red Spider Lily, acrylic on lattice pattern brass leaf Torinoko paper, 11.6x17.5”, 2025. It’s impossible to simultaneously photograph the painting well and show the reflective sheen of the paper, so just know that this painting is far more regal in person due to the golden metallic luster of the substrate.

Attending a Chopstick-Making Workshop in Kawagoe

Last year in advance of my residency, I attended washi paper-making and kintsugi workshops in Tokyo before heading down to Yakushima, an island known for its natural wonders. There are always more things one could do than time to do them in, so I prioritized immersion in nature to gather reference imagery and experiences, but one of the opportunities I was sad to miss out on in Yakushima was the chance to make my own set of wooden chopsticks.

Since I was lucky enough to get to come back to Japan this summer, I looked into whether there were any chopstick workshops in or around Tokyo. The most frequent recommendation was to visit a town called Kawagoe, which by a combination of train, bus, and walking was about an hour and a half away from where I was staying. There, Wood Works Kawagoe (Karaki Woodworking) offers a workshop in making chopsticks.

When you arrive at the shop, you either can begin right away if there are available seats or you get a digital ticket reservation. When I showed up, all the seats were full but I was the first in line. One of the workers told me it would likely be around 45min wait, so I walked around the touristic “old town” streets of Kawagoe for a little bit, but 15 minutes later my seat was already open!

You first choose from a suite of wood blanks, selecting for either appearance, hardness, or both. I was instantly most attracted to the high contrast bocote of the selection options, which also happened to be one of the harder woods (and one of the most expensive). The shop presented the hardness of the wood as a potential upside and downside simultaneously, in that hardwood is good long-term for durability but is more difficult to shape, as it requires more strength to plane and sand. Bocote is a decorative wood not native to Japan (imported from Central America), but there are a lot of traditional woods for chopsticks that are imported including ebony, rosewood, and purpleheart.

I particularly liked one of the bocote wood blanks that had eyes in it, so I asked if they had any more pieces than what were on display so I could find a matching pair, and the staff kindly opened a deep drawer full of more blanks. I found two pieces that had a lot of contrast and some eyes.

A photo of me shaving down the first of my wood blanks.

Then I began the process of making my chopsticks. The blanks are printed with numbers on them, and you place one into a former in a specific sequence and shave down the wood with a plane until it becomes flush with the mold. You then rotate and put into the correct space in the sequence and do it again and again until you’ve done all four sides. Then you repeat the process with the second chopstick. I have to say that the hardness of the bocote was no problem at all at any stage, so I wouldn’t let the shop’s talk of needing sufficient strength impact your wood selection choice.

Sanding the chopsticks with coarse sandpaper.

Once you have finished planing, you refine the shape with a coarse sandpaper. Once you are happy with the shape of your chopsticks, you then polish them with a fine sandpaper. On this step, I polished until I thought they were likely good, and then asked a staff member to check. They said they could use more polishing, so I went back at it. I then asked again and received the same answer (which I was happy about - I wasn’t sure what I was supposed to be aiming for or what was possible to achieve with the provided sandpaper, so I appreciated the feedback!). After polishing a third time, I got the OK to move onto the final step: oiling. I dipped each chopstick into linseed oil and rubbed it into the wood. This helps seal the surface while also highlighting the woodgrain.

When completed, you package the chopsticks and you’re done! I liked mine so much I thought maybe I should buy some sets of bocote chopsticks as souvenirs for others (the workshop also sells their own finished chopsticks), but when I went to look at their three bocote sets available for purchase, they were not nearly as beautiful as mine (and they were more expensive than mine as well, to cover the labor!). I ended up leaving with just my set. The workshop in total, including the type of wood blanks I selected, cost me about $35.

My finished, handmade set of bocote chopsticks!